From Evernote: |
2. 架設Tomcat 6 MySql VPS CentOs 6 設定SSH及金鑰設定 |
2. 設定SSH及金鑰設定
2-1 先用申請帳號密碼登入
login as: root #已root 最高權限登入 root@198.136.31.233's password: #輸入所設定的密碼 Last login: Fri Jun 28 03:38:35 2013 from 60-249-72-68.hinet-ip.hinet.net [root@jay ~]# #已成功登入 |
2-2 SSH2的公鑰與私鑰的建立
[root@jay ~]# su - root #選擇權限 製作rootd的公鑰 [root@jay ~]# ssh-keygen -t rsa #製作公鑰 Generating public/private rsa key pair. Enter file in which to save the key (/root/.ssh/id_rsa): #按Enter即可 Created directory '/root/.ssh'. Enter passphrase (empty for no passphrase): #按Enter即可 Enter same passphrase again: Your identification has been saved in /root/.ssh/id_rsa. Your public key has been saved in /root/.ssh/id_rsa.pub. The key fingerprint is: #按Enter即可 6c:85:35:6c:0b:fe:cc:2e:45:88:65:55:8b:1e:d3:6f root@jay.cnkk.org The key's randomart image is: +--[ RSA 2048]----+ | o+.. | | +oo+ . | | =.+=.o | | ..oooo . | | S=. E | | . = . | | o | | . . | | . | +-----------------+ #製作完成 [root@jay ~]# |
2-2 SSH2的公鑰與私鑰的建立
[root@jay ~]# cd ~/.ssh #進入SSH配置文件的目錄 [root@jay .ssh]# ls -l #列出文件 total 8 -rw------- 1 root root 1675 Jun 28 04:17 id_rsa #確認私鑰已被建立 -rw-r--r-- 1 root root 399 Jun 28 04:17 id_rsa.pub #確認公鑰已被建立 [root@jay .ssh]# cat ~/.ssh/id_rsa.pub >> ~/.ssh/authorized_keys #公鑰內容輸出到相應文件中 [root@jay .ssh]# rm -f ~/.ssh/id_rsa.pub #刪除原來的公鑰文件 [root@jay .ssh]# chmod 400 ~/.ssh/authorized_keys #將新建立的公鑰文件屬性設置為400 [root@jay .ssh]# exit #退出一般用戶的登錄 logout [root@jay ~]# |
2-3 下戴私鑰
將私鑰 id_rsa 下戴好保護好作為以後登入的主要依據,下一步要設定成金鑰登入方式所以要先下戴好。
下戴方法一 配合 Xshell4 與 Xftp4 下載

下戴方法二 用FileZilla下戴
下戴id.rsa

2-3 SSH相關配置文件的修改
用vi 文字編輯器修改文件檔
[root@jay .ssh]# vi /etc/ssh/sshd_config |
# $OpenBSD: sshd_config,v 1.80 2008/07/02 02:24:18 djm Exp $ # This is the sshd server system-wide configuration file. See # sshd_config(5) for more information. # This sshd was compiled with PATH=/usr/local/bin:/bin:/usr/bin # The strategy used for options in the default sshd_config shipped with # OpenSSH is to specify options with their default value where # possible, but leave them commented. Uncommented options change a # default value. #Port 22 #AddressFamily any #ListenAddress 0.0.0.0 #ListenAddress :: # Disable legacy (protocol version 1) support in the server for new # installations. In future the default will change to require explicit # activation of protocol 1 Protocol 2 # HostKey for protocol version 1 #HostKey /etc/ssh/ssh_host_key # HostKeys for protocol version 2 #HostKey /etc/ssh/ssh_host_rsa_key #HostKey /etc/ssh/ssh_host_dsa_key # Lifetime and size of ephemeral version 1 server key #KeyRegenerationInterval 1h #ServerKeyBits 1024 #找到這一行,將行首的「#」去掉 ServerKeyBits 1024 #修改後變為此狀態 # Logging # obsoletes QuietMode and FascistLogging #SyslogFacility AUTH SyslogFacility AUTHPRIV #LogLevel INFO # Authentication: #LoginGraceTime 2m #PermitRootLogin yes #找到這一行,將行首的「#」去掉 PermitRootLogin yes #修改後變為此狀態 允許用root進行登錄 #StrictModes yes #MaxAuthTries 6 #MaxSessions 10 #RSAAuthentication yes #PubkeyAuthentication yes #AuthorizedKeysFile .ssh/authorized_keys #AuthorizedKeysCommand none #AuthorizedKeysCommandRunAs nobody # For this to work you will also need host keys in /etc/ssh/ssh_known_hosts #RhostsRSAAuthentication no # similar for protocol version 2 #HostbasedAuthentication no # Change to yes if you don't trust ~/.ssh/known_hosts for # RhostsRSAAuthentication and HostbasedAuthentication #IgnoreUserKnownHosts no # Don't read the user's ~/.rhosts and ~/.shosts files #IgnoreRhosts yes # To disable tunneled clear text passwords, change to no here! #PasswordAuthentication yes #PermitEmptyPasswords no #找到此行將行頭的「#」刪除,不允許空密碼登錄 PermitEmptyPasswords no #修改後變為此狀態,禁止空密碼進行登:錄 PasswordAuthentication yes #找到這一行,將yes改為no PasswordAuthentication no #修改後變為此狀態,不允許密碼方式的登錄 # Change to no to disable s/key passwords #ChallengeResponseAuthentication yes ChallengeResponseAuthentication no # Kerberos options #KerberosAuthentication no #KerberosOrLocalPasswd yes #KerberosTicketCleanup yes #KerberosGetAFSToken no #KerberosUseKuserok yes # GSSAPI options #GSSAPIAuthentication no GSSAPIAuthentication yes #GSSAPICleanupCredentials yes GSSAPICleanupCredentials yes #GSSAPIStrictAcceptorCheck yes #GSSAPIKeyExchange no # Set this to 'yes' to enable PAM authentication, account processing, # and session processing. If this is enabled, PAM authentication will # be allowed through the ChallengeResponseAuthentication and # PasswordAuthentication. Depending on your PAM configuration, # PAM authentication via ChallengeResponseAuthentication may bypass # the setting of "PermitRootLogin without-password". # If you just want the PAM account and session checks to run without # PAM authentication, then enable this but set PasswordAuthentication # and ChallengeResponseAuthentication to 'no'. #UsePAM no UsePAM yes # Accept locale-related environment variables AcceptEnv LANG LC_CTYPE LC_NUMERIC LC_TIME LC_COLLATE LC_MONETARY LC_MESSAGES AcceptEnv LC_PAPER LC_NAME LC_ADDRESS LC_TELEPHONE LC_MEASUREMENT AcceptEnv LC_IDENTIFICATION LC_ALL LANGUAGE AcceptEnv XMODIFIERS #AllowAgentForwarding yes #AllowTcpForwarding yes #GatewayPorts no #X11Forwarding no X11Forwarding no #X11DisplayOffset 10 #X11UseLocalhost yes #PrintMotd yes #PrintLastLog yes #TCPKeepAlive yes #UseLogin no #UsePrivilegeSeparation yes #PermitUserEnvironment no #Compression delayed #ClientAliveInterval 0 #ClientAliveCountMax 3 #ShowPatchLevel no #UseDNS yes #PidFile /var/run/sshd.pid #MaxStartups 10 #PermitTunnel no #ChrootDirectory none # no default banner path #Banner none # override default of no subsystems Subsystem sftp /usr/libexec/openssh/sftp-server # Example of overriding settings on a per-user basis #Match User anoncvs # X11Forwarding no # AllowTcpForwarding no # ForceCommand cvs server |
2-4 重新啟動SSH服務
重新啟動後SSH無法以正常的密碼的方式是無法登錄SERVER,一定要用私鑰才能登入
[root@jay .ssh]# /etc/init.d/sshd restart Stopping sshd: [ OK ] Starting sshd: [ OK ] [root@jay .ssh]# |
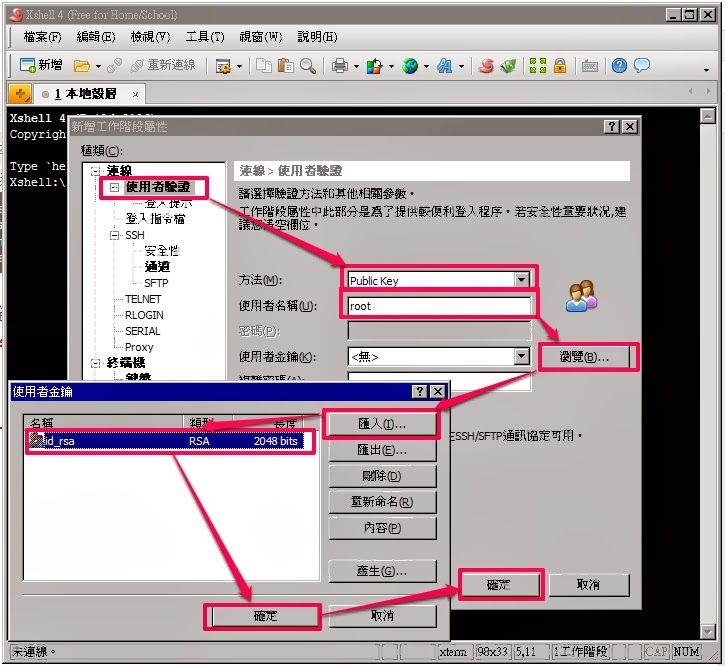
2-5 透過金鑰使用SSH
方法一 Xshell4
使用Xshell最為簡單


方法二 putty
2-5-2-1
因為putty金鑰格式為ppk所以要先用puttygen.exe轉換


沒有留言:
張貼留言